How to Create a Freelance Invoice from Scratch

You just finished a project, the client is happy, and now you need to get paid. But if you have never built an invoice before, staring at a blank document can feel surprisingly intimidating. Knowing how to create a freelance invoice from scratch is one of the most practical skills you can develop as an independent worker. A clear, professional invoice does more than request payment. It sets expectations, reduces back-and-forth, and makes you look like someone who runs a real business.
What Every Freelance Invoice Needs
Before you open any tool, you need to know the essential elements that make an invoice valid and professional. Missing even one of these can delay payment or create confusion.
Every freelance invoice should include:
- Your name or business name, address, email, and phone number
- Client's name or company name, address, and contact info
- A unique invoice number (start at 001 or 1001 and go up sequentially)
- Invoice date and payment due date
- Itemized list of services with descriptions, hours or quantities, and rates
- Subtotal, taxes (if applicable), and total amount due
- Payment terms (Net 15, Net 30, or due on receipt)
- Accepted payment methods (bank transfer, PayPal, Stripe, etc.)
Think of these as the non-negotiable building blocks. Skip any one of them and you risk delayed payment, awkward follow-ups, or worse, a dispute over what you actually delivered.

How to Create a Freelance Invoice Step by Step
Here is exactly how to create a freelance invoice from scratch, broken into manageable steps.
Step 1: Set up your header. Put your business name (or full name) and logo at the top. Below that, add your address, email, and phone number. This immediately tells the client who the invoice is from.
Step 2: Add the client details. Below your info, include the client's name, company, and address. If the client gave you a purchase order (PO) number, add it here. Larger companies often require a PO number to process payment.
Step 3: Assign an invoice number and date. Use a sequential numbering system. Your first invoice might be INV-001, the next INV-002. This keeps your records clean and makes it easy to reference specific invoices later. Add the date you are sending the invoice.
Step 4: Itemize your work. This is the most important section. List each service on its own line with a brief description, the quantity or hours, and the rate. For example:
- Website homepage copy | 4 hours | $75/hr | $300
- Blog post (1,200 words) | 3 hours | $75/hr | $225
- Revision round | 1 hour | $75/hr | $75
Being specific here protects you. Clients can see exactly what they are paying for, which reduces questions and disputes.
Step 5: Add taxes, discounts, and total. If you need to charge sales tax, list it as a separate line. Then show the grand total prominently. Make it impossible to miss.
Step 6: State your payment terms. Write the due date clearly. Instead of just saying "Net 30," spell it out: "Payment due by April 15, 2026." Research shows that invoices with specific due dates get paid faster than those with vague terms.
Step 7: Include payment instructions. Tell the client exactly how to pay. List your bank transfer details, PayPal email, or a link to your Stripe payment page. The fewer steps between your client reading the invoice and sending money, the better.

Freelance Invoice Mistakes That Delay Payment
Even experienced freelancers make invoicing mistakes that slow down their cash flow. Here are the ones to watch for.
Sending invoices late. The longer you wait after completing work, the lower the priority your invoice becomes in the client's mind. Send your invoice within 24 hours of delivering the final work.
Vague descriptions. Writing "consulting services" tells the client nothing. Use specific descriptions like "3-hour brand strategy session on March 10" so the client can match the invoice to the work they approved.
Missing payment details. If a client has to email you to ask how to pay, you have already lost days. Always include complete payment instructions on every invoice.
No invoice number. Without a number, neither you nor the client can easily reference the invoice in follow-up conversations. It also makes your bookkeeping harder at tax time.
Not following up. About 39% of invoices in the US are paid late. Do not be afraid to send a polite reminder the day after the due date. A simple follow-up can cut your average payment time by a week or more.
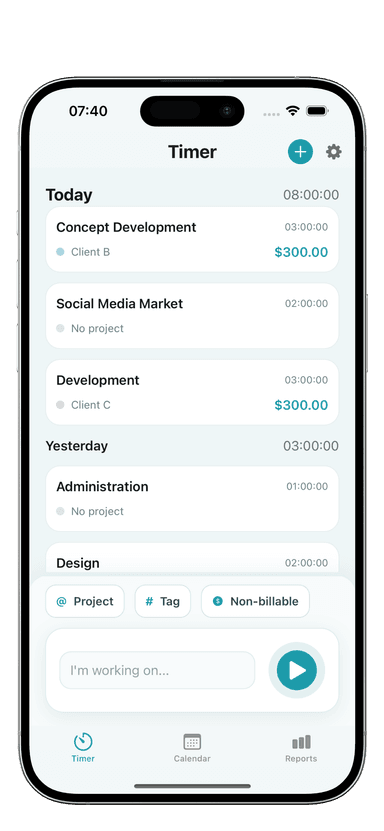
Tracking your time accurately with a tool like Toggle Time Tracker makes itemizing your invoice straightforward. When you log hours by project and task, building that itemized list takes minutes instead of guesswork.
Choosing the Right Tool for Your Invoices
You have several options for creating invoices, each with trade-offs.
Spreadsheets (Google Sheets, Excel). Free and flexible, but you build everything manually. Good for freelancers who want full control and only send a few invoices per month.
Word processors (Google Docs, Word). Many free templates exist. They look clean but lack automation. You will need to update totals, dates, and numbers by hand each time.
Invoicing software (FreshBooks, Wave, Bonsai). These automate numbering, calculate taxes, send reminders, and track payment status. Worth considering once you invoice multiple clients regularly.
PDF export from time tracking. Some time trackers let you export your logged hours directly into a report format. Toggle Time Tracker, for instance, lets you export professional PDF and Excel reports organized by project, which you can attach to or use as the basis for your invoice.
The best tool is the one you will actually use consistently. Start simple and upgrade as your client list grows.
How to Build an Invoice System That Scales
Creating one invoice is straightforward. The real challenge is building a system that works when you have five clients, 15 invoices a month, and tax season approaching.
Create a template you reuse. Set up your header, payment terms, and payment details once. For each new invoice, you only need to update the client info, line items, and dates.
Track everything from the start. Log your hours as you work, not from memory at the end of the week. Freelancers who track time in real time bill 15-20% more accurately than those who estimate after the fact. Using a dedicated time tracker keeps your data organized by client and project, so invoicing becomes a quick export rather than a reconstruction project.
Set a regular invoicing schedule. Pick a day each week or month to send all invoices. Consistency helps your cash flow and trains clients to expect your invoices on a predictable schedule.
Keep a payment log. Track which invoices are sent, which are paid, and which are overdue. A simple spreadsheet works, or you can use invoicing software that tracks this automatically.
If you are already using Toggle Time Tracker to track your billable hours, you have the hardest part covered. Your time data feeds directly into accurate, itemized invoices.

Your Invoicing Checklist
Before sending any invoice, run through this quick checklist:
- Your contact info is correct and complete
- Client name and address are accurate
- Invoice number is unique and sequential
- Every line item has a description, quantity, rate, and total
- Payment terms include a specific due date
- Payment method instructions are clear
- Tax is included if required
- Total amount is correct and easy to find
Once you know how to create a freelance invoice from scratch, the process becomes second nature. Pair solid invoicing habits with clear payment terms, and you will build a system that gets you paid on time, every time.
Download Toggle Time Tracker and start turning your tracked hours into professional invoices today.